Without a project management timeline, completing a project charter or plan is impossible.
A project timeline provides a quick and straightforward project overview from start to finish. It promotes increased work efficiency among team members.
However, many new project managers find breaking down projects into effective timelines an overwhelming task despite appearing simple on paper.
Don’t worry if it is your first time creating a project timeline; this guide is for you!
Table of Contents
What is a Project Timeline?
A project timeline is a project’s deliverables overview presented in chronological order. It helps map out the tasks to be completed before new ones start and keep everything organized.

In most cases, a project management timeline comes in a visual format, allowing team members, project managers, and stakeholders to get a quick project overview at a glance. In return, they can have a big picture of the project roadmap, including task management, dependencies, milestones, cost estimations, and delivery dates.
Project timelines come in three different forms: Gantt Timelines, Historical Timelines, and Vertical Chart Timelines. Each type has its own advantages and disadvantages. So, project managers must weigh their priorities and choose the one that is best suited to the project’s needs.
Gantt Timeline
A Gantt chart or timeline provides a quick project snapshot, including the assigned team member to each task, dependencies, key milestones, and tasks’ end dates.
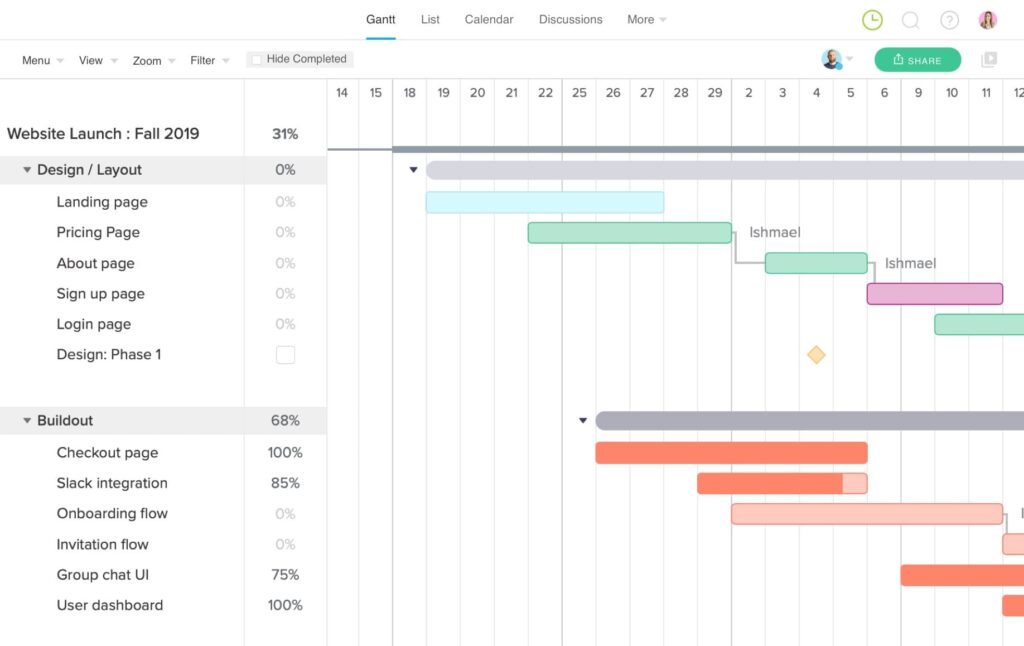
Gantt charts today are particularly interactive. They allow users to update and edit in real-time. As a result, they become a handy addition to projects since they are always up-to-date and flexible.
Historical Timeline
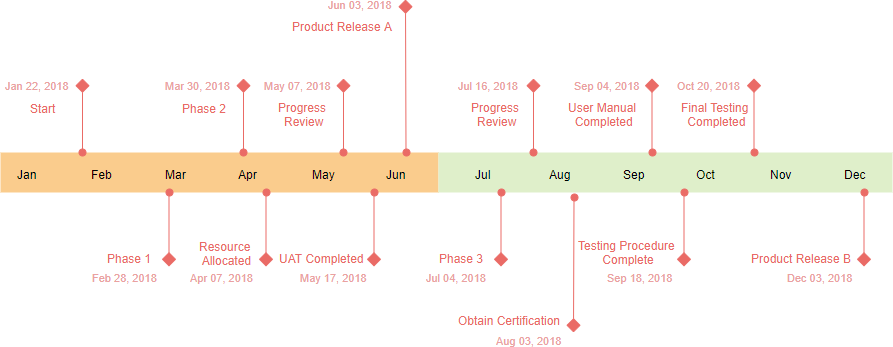
A historical timeline is designed to lay out tasks in a project chronologically, either from top to bottom or left to right. The historical timeline’s structure involves key dates from a particular time.
Vertical Chart Timeline
A vertical chart timeline is suitable for projects dealing with data, like marketing departments or finance projects.
This timeline displays the progress or gains of something over a particular timeline, including how much MRR (monthly recurring revenue) is coming in or how much website traffic is generated monthly.
Why Is It Important to Have a Project Timeline?
A project management timeline gives project managers a chance to:
- Determine team members assigned to particular tasks
- Break the project into different phases
- Organize tasks
- View task deadlines
- Show when the tasks should start
Since the tasks are presented in chronological order, project managers and team members can identify which task must be accomplished before starting a new one. Some project timelines are used in organizational needs and project requirements, including the Gantt chart.
Here are the top benefits of a project management timeline:
Organizes Tasks Efficiently: As you create a project management timeline, you have to list down all project’s essential parts. This allows you to break down tasks and set various milestones by hierarchy.
The project timeline gives project managers an idea of which tasks need to be prioritized and the most critical. It assists in creating an efficient process since you know what tasks need to be finished before anything else.
With the project timeline, you can determine tasks with dependencies. Part of project timeline creation is identifying which tasks are dependent on other activities to start or end.
Having a clear project view, you know which things need to be accomplished, discover potential issues, and prevent bottlenecks in the project. As a result, you can better plan for potential problems while avoiding delays.
Improves Communication Among Teams: Most projects involve different team members and plenty of moving parts. For such a thing, good communication is necessary to ensure success, and a project timeline can help you with that.
If you create a project timeline, you have an opportunity to determine which team members are responsible for different project phases. Having these details laid out on the timeline makes relaying information to the right person quicker.
Project managers can quickly address concerns and seek clarification from particular team members. This allows each member to get involved in the project promptly, which improves work productivity.
Monitors Progress and Milestones More Easily: A project timeline helps identify when you should complete a project through a reasonable time estimate for every task. You can also set critical milestones or dates that mark the project’s phase end and the start of the next.
If every deadline, milestone, and task is reflected in the project management timeline, you can obtain the entire project schedule’s clear view. In return, tracking what is happening as well as when it is happening is easier.
Improves Time Management: Time plays a critical role in every business or organizational success. It impacts every aspect, from planning to accomplishing deliverables. A project timeline helps appropriately plan a project and recognize the tasks that need to be completed first.
Moreover, a project timeline allows the team to see the project’s overall progress. It recognizes each team member’s weekly assignment while helping them focus on their tasks more effectively. It also motivates them as they see accomplished deliverables and tasks from the to-do-lists.
Applies Changes More Easily: As a project manager, you know that some issues may occur no matter how well-planned a project is. So, you must be flexible and respond to these issues at hand immediately. This is where you may need to apply changes or reorganize some details to the initial plans.
In other words, deliverables and priority tasks may need to change. If you create a project timeline, you can implement these changes more easily. You can also see other adjustments you should make without affecting the project’s success.
Do you want to deliver project on time?
Start tracking your time with Quidlo Timesheets. 30-day trial.
No commitment or credit card required.
What are the Steps to Create a Project Timeline?
In every project timeline, the five key parts are:
- The tasks
- The due dates
- The dependencies
- The duration of each task
- The assigned employees or team members
Here are the 6 easy steps on how to create a project timeline:
Step #1: Determine and Understand the Project Scope
First, you have to know the scope of your project. This helps decipher the project’s overall timeline, how long does it take for each task to be completed, and how many team members are needed to accomplish specific tasks.
You can start by writing the scope statement, including the deliverables and resources. For instance, you can make a scope statement, like “we will create a three-page web design and a logo for XXX by [date],” if you run a rebranding project for new clients.
Step #2: Split the Project into Milestones
After writing the project scope statement, it’s time to list out every single detail involved.
From the example above, the logo design project must include:
- A branding workshop
- Color palette research
- Mock-up designs
- Edits
- Other deliverables involved in the project
Then, you can turn your list into milestones. For instance, “What tasks need to occur first? At what point will you share the progress with team members and stakeholders?”
Your first milestone can be “to complete five (5) mock-up logos.” This involves design team meetings, competitor research, client questionnaires, and the actual design process.
Step #3: Estimate How Much Time Each Task Will Take
Since you have broken down the project into parts, you can estimate how long it will take to complete a particular task.
Although it can be challenging to know how much time is going to take with five mock-up logos, you can still be certain regarding the timeframes involved to carry out competitor research, run a client questionnaire, and host a team meeting.
You can put an estimated timeframe against every smaller task listed. That way, you can see how the project progresses.
Step #4: Assign Tasks to Each Team Member
During this stage, you must dish out each task to your team. You can begin by noting down all necessary resources for the project. Then, match them up with the talents, skills, or expertise of your team.
You can experiment with your team’s advantage to acquire the best results. For instance, if some of your team is not skillful when it comes to web design, you can let them concentrate on the logo design while others can work on the web design.
Step #5: Pick a Project Management Software
While you can track a project timeline using a manual method like a spreadsheet, project management software makes the process easier. Since a project management tool can update in real-time, you can prevent overlapping tasks. You can also ensure all team members are on the same page at all times.
With project management software, you can track each individual task timeline and manage complex projects. You can also assign each project task to a particular team member. Then, handle all communication through the software. As a result, you can keep everything in one place.
Step #6: Plot Every Task on the Timeline
Map out every task on the timeline and make a note of any task dependencies. In the logo design project, for example, perform the color palette research before starting any design work. Then, ensure to plot each task accordingly.
You can start knowing what tasks will be occurring at any given time. Your team can also manage their schedules more efficiently.
Example of a Project Management Timeline
Without creating a project timeline, you cannot get an in-depth project overview from start to finish. It will help you see when activity in a project starts and when it is due. And most importantly, you can determine whether a task is dependent on another one or not.
Below is a Gantt chart timeline example.
Web Design Project Plan
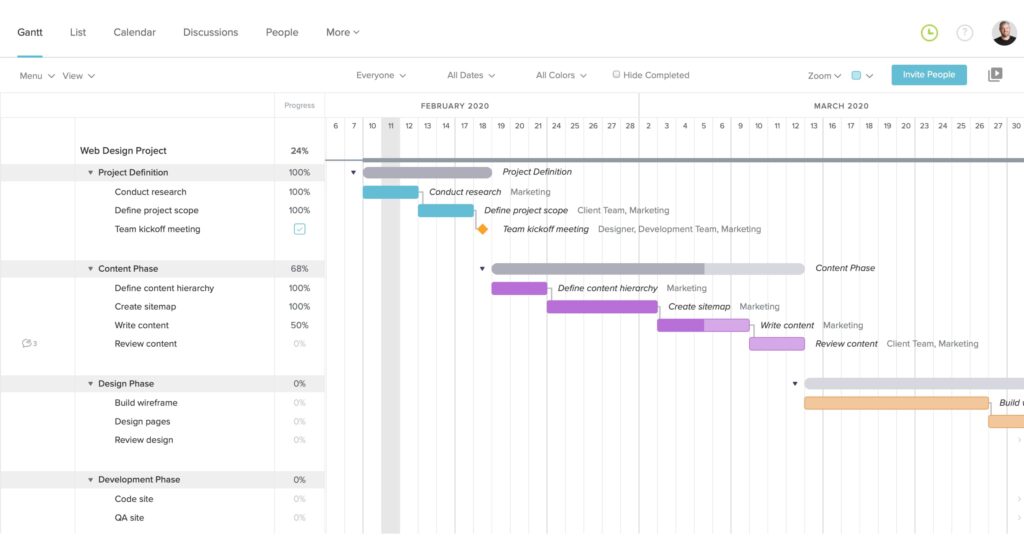
In this example of a project management timeline for a web design project, a research for the main layout, content presentation, concept generation, prototypes, multimedia assets, finalizing, bug reports are included.
Creating a Project Timeline: Best Practices
When creating a project management timeline, ensure to consider the best practices for best results. Here are some practices you should consider:
Revise the Project Timeline Regularly
Changes occur in projects from time to time. So, ensure to reflect those changes in your timeline. You can use a project timeline software to create a project timeline and update it once it progresses/
Determine Critical Path
Determining the critical path is essential to knowing the activities that identify your project’s duration. You should know which actions must be completed in a specific period. Remember that completing the project based on schedule is critical to ensure project success.
Use a Project Timeline Template
Not all project managers are ready to make a leap. This is where project timeline templates are helpful. Use templates to streamline the project timeline creation process. It helps to work more productively.
In a project timeline template, you can organize tasks and set the duration of tasks and dates. You can reuse it in the future.
Communicate with Team Members and Stakeholders
When making any changes in the project timeline, ensure to meet with your team and stakeholders for effective communication. You can use the software to facilitate this communication process, allowing you to easily make project timeline changes and share them with team members and stakeholders.
Final Words
Although creating a project timeline can be daunting at first, it offers plenty of advantages, from organizing tasks efficiently to applying any changes. With a project management timeline, you can improve your team’s overall productivity and ensure project success without adding plenty of work in the process.


